The Oku Electronics Blog
Demystifying the I2C Module for Arduino
Demystifying the I2C Module for Arduino: A Guide for Beginners
In the world of Arduino, the I2C (Inter-Integrated Circuit) module is a powerful tool that enables communication between multiple devices using just two wires. This blog post serves as a beginner’s guide to understanding and utilizing the I2C module for Arduino projects. By the end, you’ll have a solid foundation to incorporate this versatile communication protocol into your own creations.
- What is the I2C Module?
The I2C module is a communication protocol that allows multiple devices to communicate with each other using a master-slave architecture. It uses two wires, known as the SDA (Serial Data) and SCL (Serial Clock), to exchange information. This simplicity and efficiency make the I2C module an ideal choice for projects requiring communication between multiple components. - Benefits of the I2C Module:
The I2C module offers several advantages, including: a. Simplicity: The I2C module requires minimal wiring and uses just two pins on the Arduino board, freeing up other pins for additional components. b. Flexibility: The I2C module supports connecting multiple devices on the same bus, allowing for a wide range of configurations. c. Addressing: Each device connected to the I2C bus has a unique address, enabling the Arduino to communicate with specific devices as needed. d. Speed: The I2C module operates at varying speeds, accommodating different data transfer rates based on the requirements of the connected devices. - Connecting I2C Devices to Arduino:
To connect I2C devices to an Arduino board, you’ll need the following: a. Arduino board with I2C pins (such as Arduino Uno or Arduino Mega).
b. I2C modules/devices (sensors, displays, EEPROMs, etc.).
c. Male-to-male jumper wires.
The I2C devices have their own SDA and SCL pins, which need to be connected to the corresponding I2C pins on the Arduino board. Ensure that the I2C module has a unique address or can be set to one before connecting multiple devices to avoid conflicts.
- Programming I2C Communication:
The Arduino IDE provides a library called “Wire” that simplifies I2C communication. You can include this library in your sketch to utilize the functions and commands needed to interact with I2C devices. a. Initializing I2C: Start by initializing the Wire library in your code using theWire.begin()function. b. Reading from I2C Devices: Use theWire.requestFrom()function to request data from an I2C device. Once received, you can read the data using theWire.read()function. c. Writing to I2C Devices: To send data to an I2C device, use theWire.beginTransmission()function, followed byWire.write()to send the data, andWire.endTransmission()to complete the process. d. Addressing I2C Devices: Specify the I2C device’s address in the code using theWire.beginTransmission()function before reading or writing to that device. - Example Project: Interfacing an I2C LCD Display:
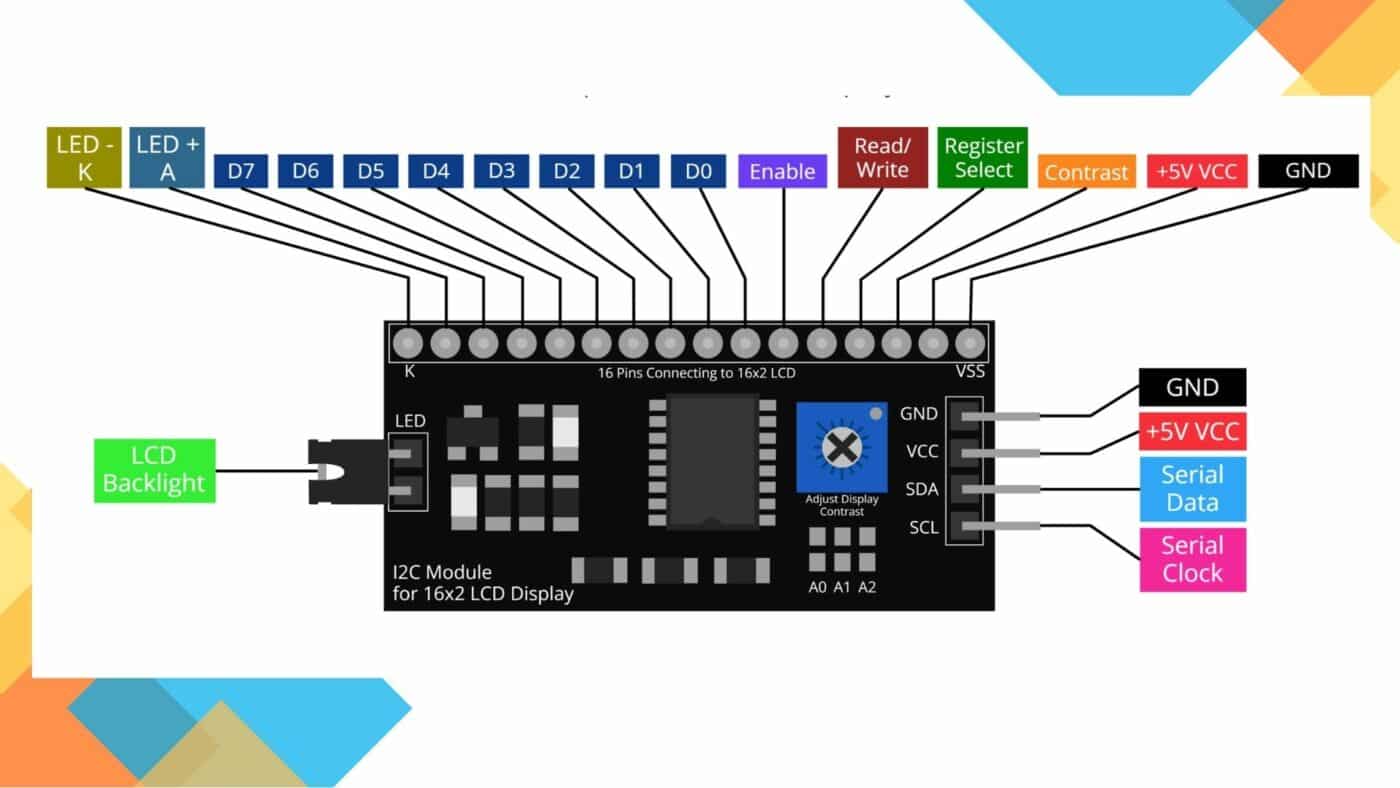
One popular application of the I2C module is interfacing with LCD displays. In this example project, we’ll connect an I2C LCD display to an Arduino and display custom messages or sensor readings. a. Connect the I2C LCD display to the Arduino using the SDA and SCL pins. b. Install the LiquidCrystal_I2C library in the Arduino IDE. c. Include the library in your sketch and use the appropriate functions to initialize and control the LCD display. d. Write code to display text or sensor readings on the LCD using the library’s functions. - Further Exploration:
Once you have a good grasp of the basics, you can explore more advanced features of the I2C module. This includes connecting multiple devices, understanding and modifying I2C addresses, and integrating complex I2C-based projects such as robotics or home automation systems.
The I2C module for Arduino opens up a world of possibilities for seamless communication between devices. Its simplicity, flexibility, and efficient use of resources make it an essential tool for hobbyists, students, and professionals alike. By understanding the fundamentals of the I2C protocol, connecting devices, and programming interactions, you can unlock the full potential of the I2C module and bring your Arduino projects to life. So, grab your Arduino board, some I2C modules, and start exploring the exciting world of I2C communication today!


